AutoML Tables: Exporting and serving your trained model to Cloud Run
Google Cloud’s AutoML Tables lets you automatically build and deploy state-of-the-art machine learning models using your own structured data. Recently, Tables launched a feature to let you export your full custom model, packaged such that you can serve it via a Docker container. This lets you serve your models anywhere that you can run a container.
In this example, we’ll show how you can package an exported Tables model to serve on Cloud Run. With Cloud Run, your model serving automatically scales out with traffic, and scales to 0 when it’s not being used. We’ll also show how you can examine your trained custom model in TensorBoard.
For the following steps, the documentation provides more detail. We’ll use the Cloud Console UI, but all of these steps could also be accomplished by accessing the API via the command line or using the AutoML Tables client libraries.
Create a Dataset and edit its schema
The first step in training a Tables model is to create a dataset, using your data. For this example, we’ll use data that is essentially a join of the London Bikes and NOAA weather public datasets in BigQuery, with some additional processing to derive additional GIS and day-of-week fields. (If you like, you can follow along with your own tabular dataset instead, but you will need to construct your own prediction instances as well).
Visit the Tables page in the Cloud Console, and enable the API as necessary.
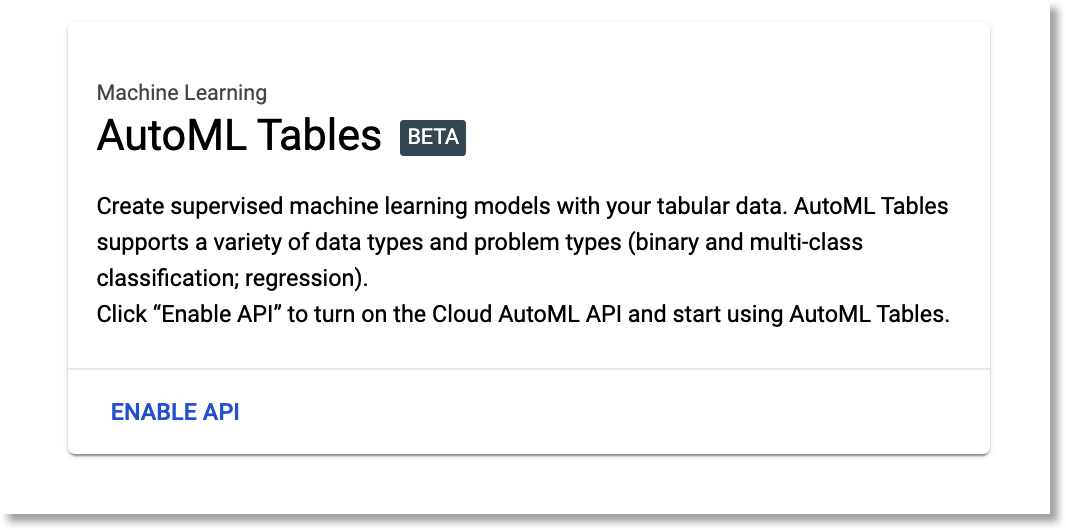
Enable the AutoML Tables API.
Then, create a new Tables dataset.
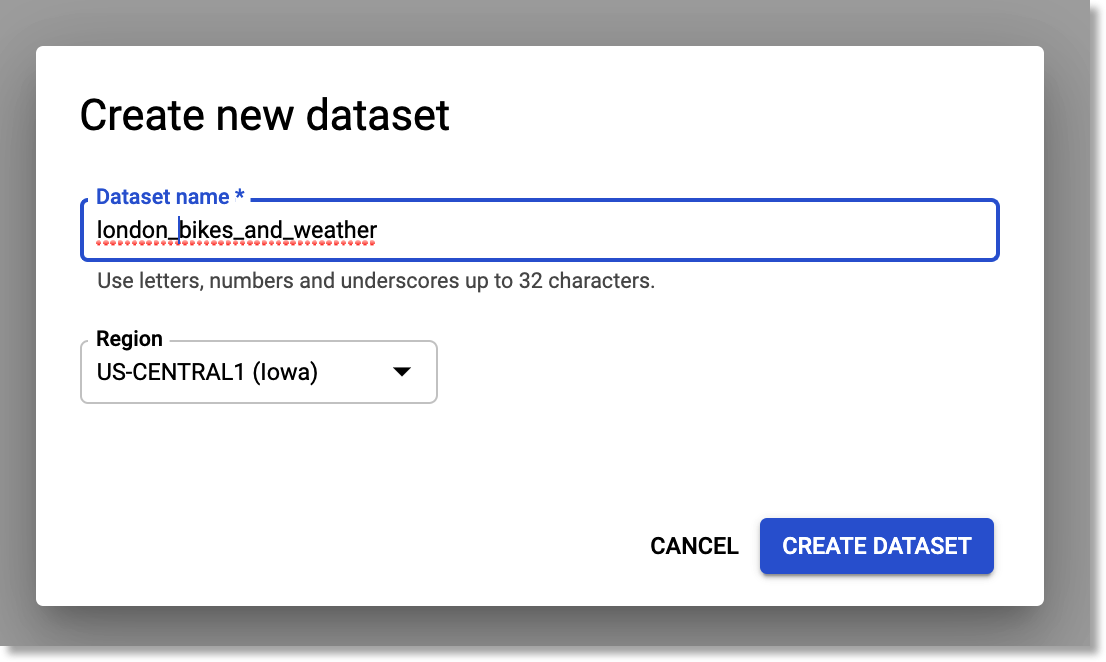
Create a new Tables dataset.
Import your data into the dataset. To ingest the example data, select “Import data from BigQuery”. Then, as shown in the figure below, use aju-dev-demos as the BigQuery Project ID, london_bikes_weather as the dataset ID, and bikes_weather as the table name.
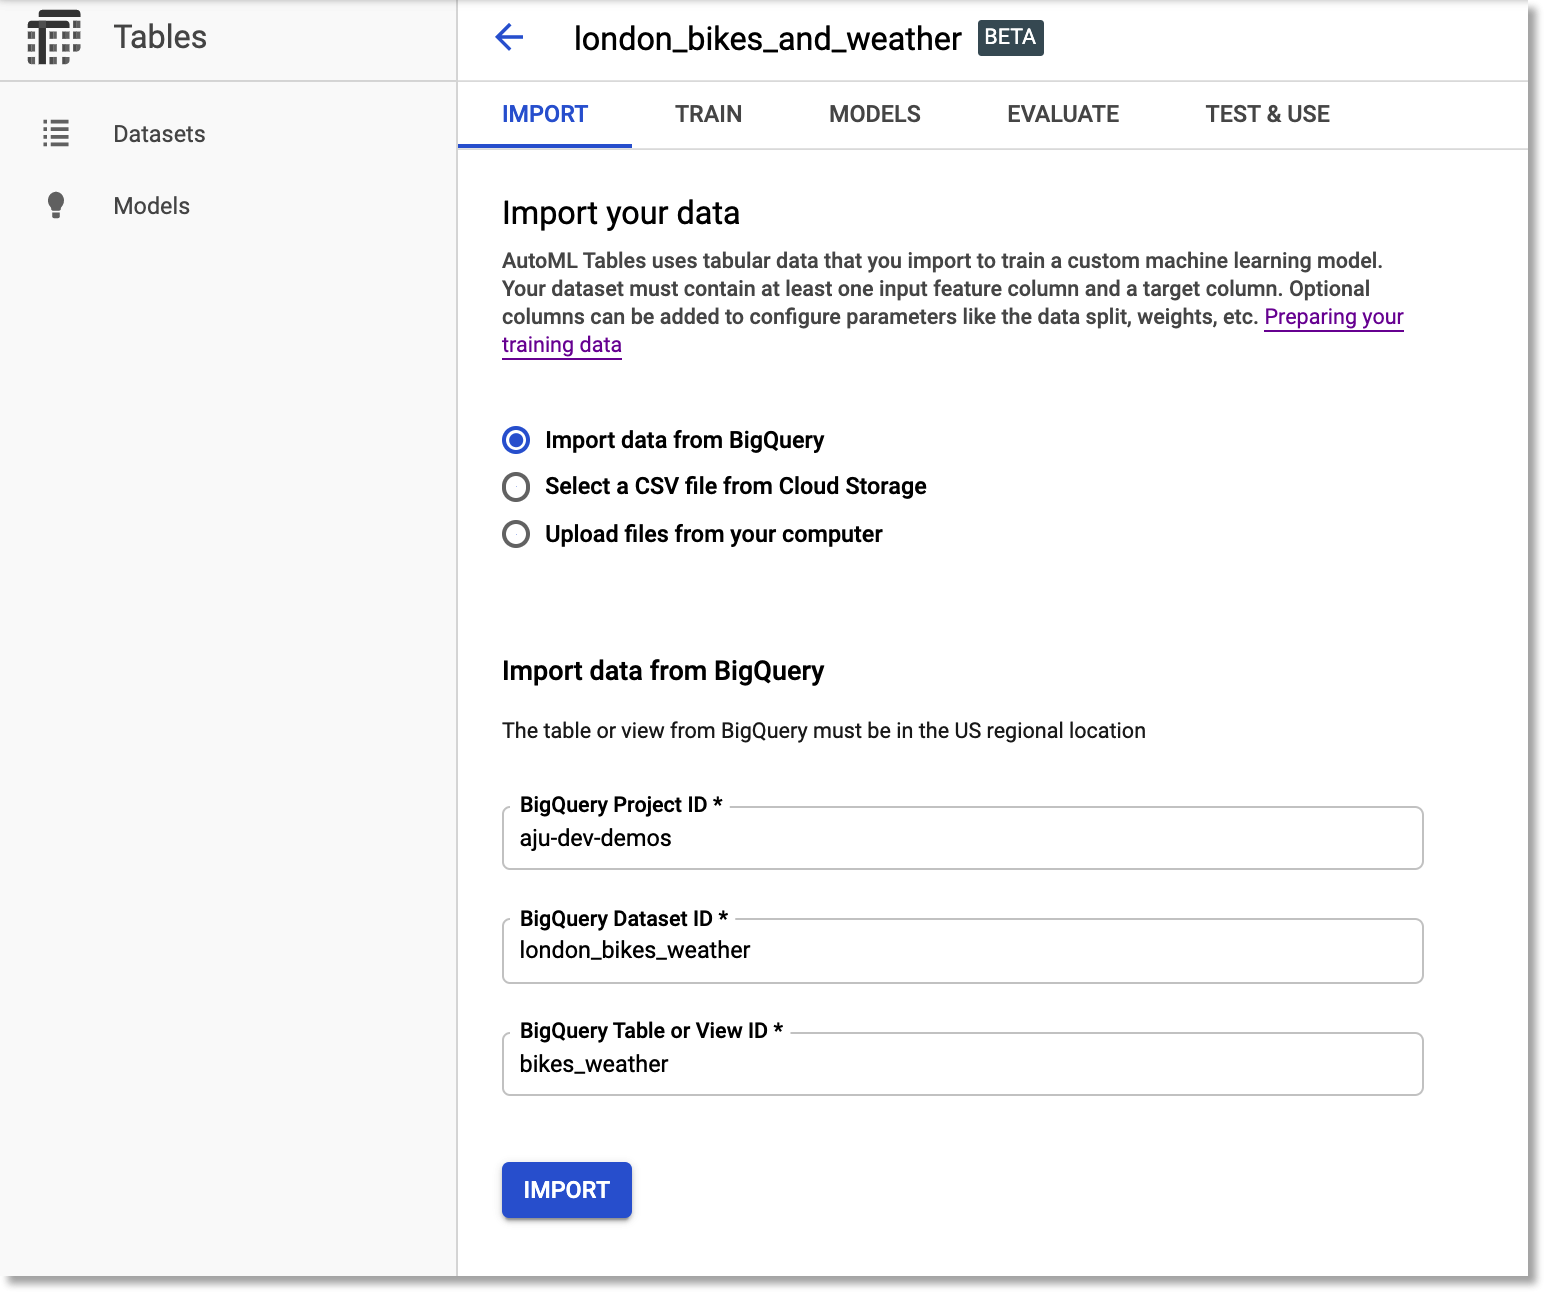
Import the
bikes_weather BigQuery table into the dataset.Edit the dataset’s schema
Once the import is complete, edit the dataset schema. We’ll need to change a few of the inferred types. Make sure your schema reflects that in the figure below. In particular, change bike_id, end_station_id, start_station_id, and loc_cross to be of type Categorical. (Note that useful stats are generated for the columns).
Then, we’ll set duration as the target column.
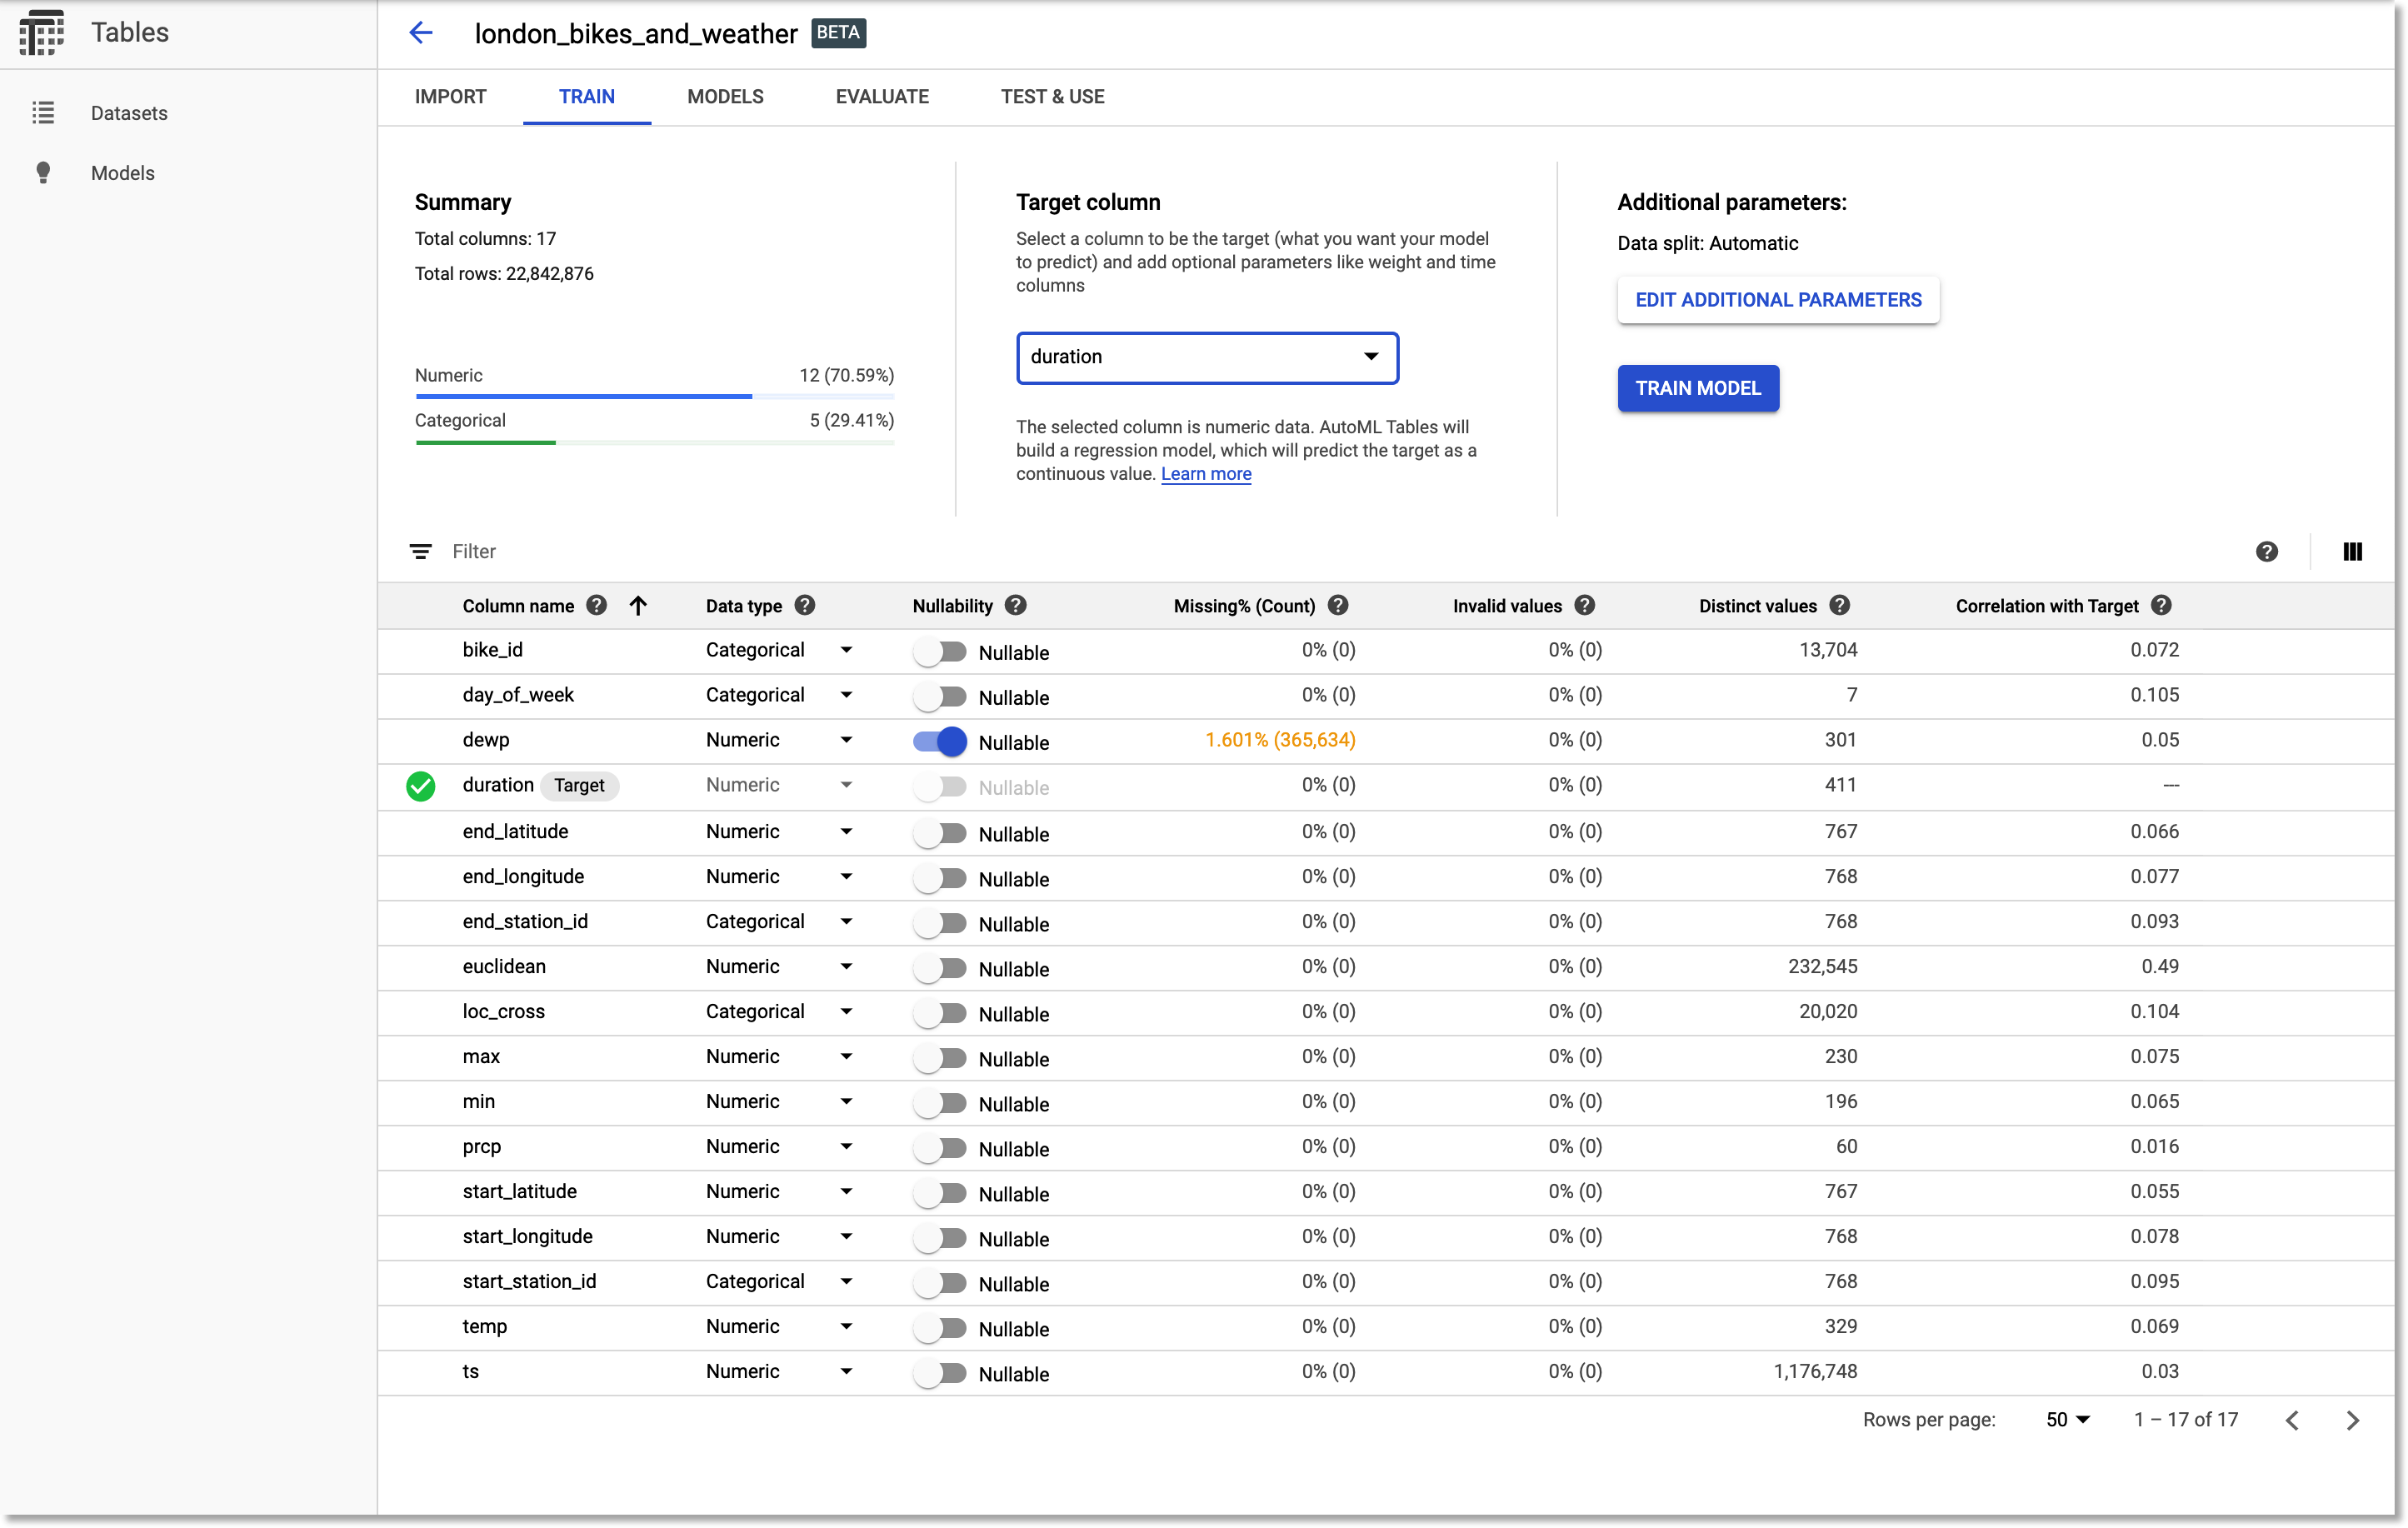
Adjust the dataset schema.
Train and export your Tables model
Now you’re ready to train a model on that dataset. After the model is trained, you will be able not only to deploy it to the Cloud AI Platform, where you can access it via API, but also can export it to run in a container.
Train the model
We’ll train a model to predict ride duration given all the other dataset inputs. So, we’ll be training a regression model.
For this example, enter a training budget of 1 hours, and include all the other feature columns.
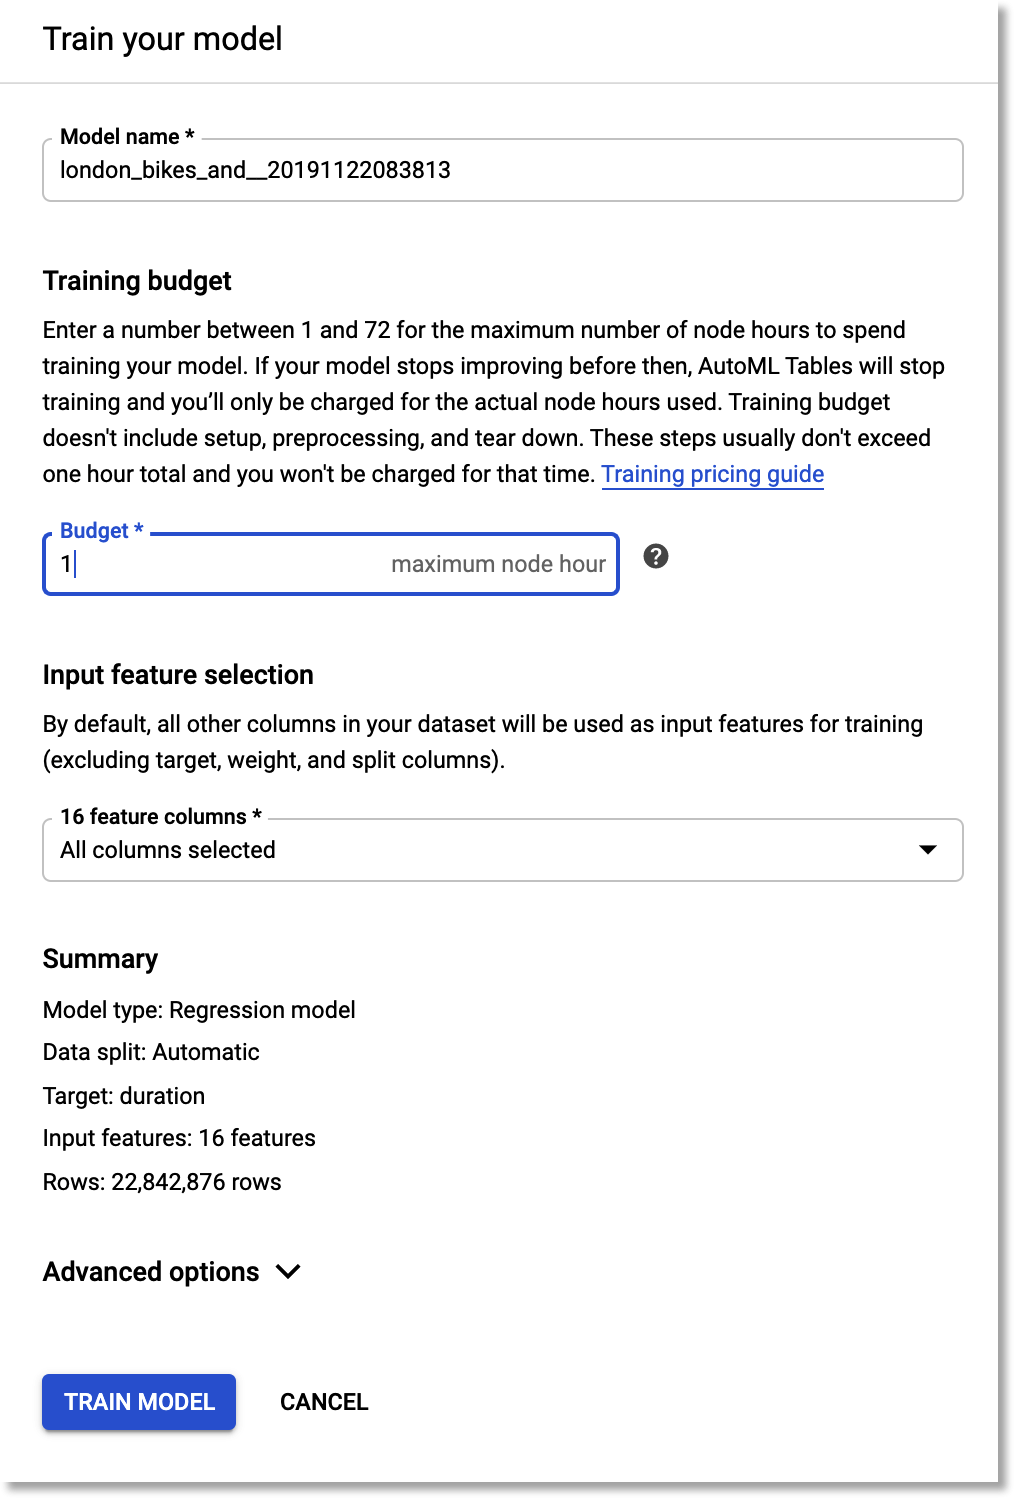
Train a model to predict ride
duration.Export the trained model
Once the model is trained, we’ll export the result, so that it can be served from any environment in which you can run a container. (Note that you could also deploy your model to the Cloud AI Platform for online prediction).
You’ll find the export option under TEST & USE. (See the documentation for detail on the export process).
You’ll need to create a regional GCS bucket, in the same region as your model. You also might want to create a sub-folder for the model export in the GCS bucket, so that if you have multiple exports, you can keep track of . An easy way to create the folder is via the web UI. Here, I’ve created a model_export_1 sub-folder.
Click the “Container” card to export your trained model to be run from a Docker container.
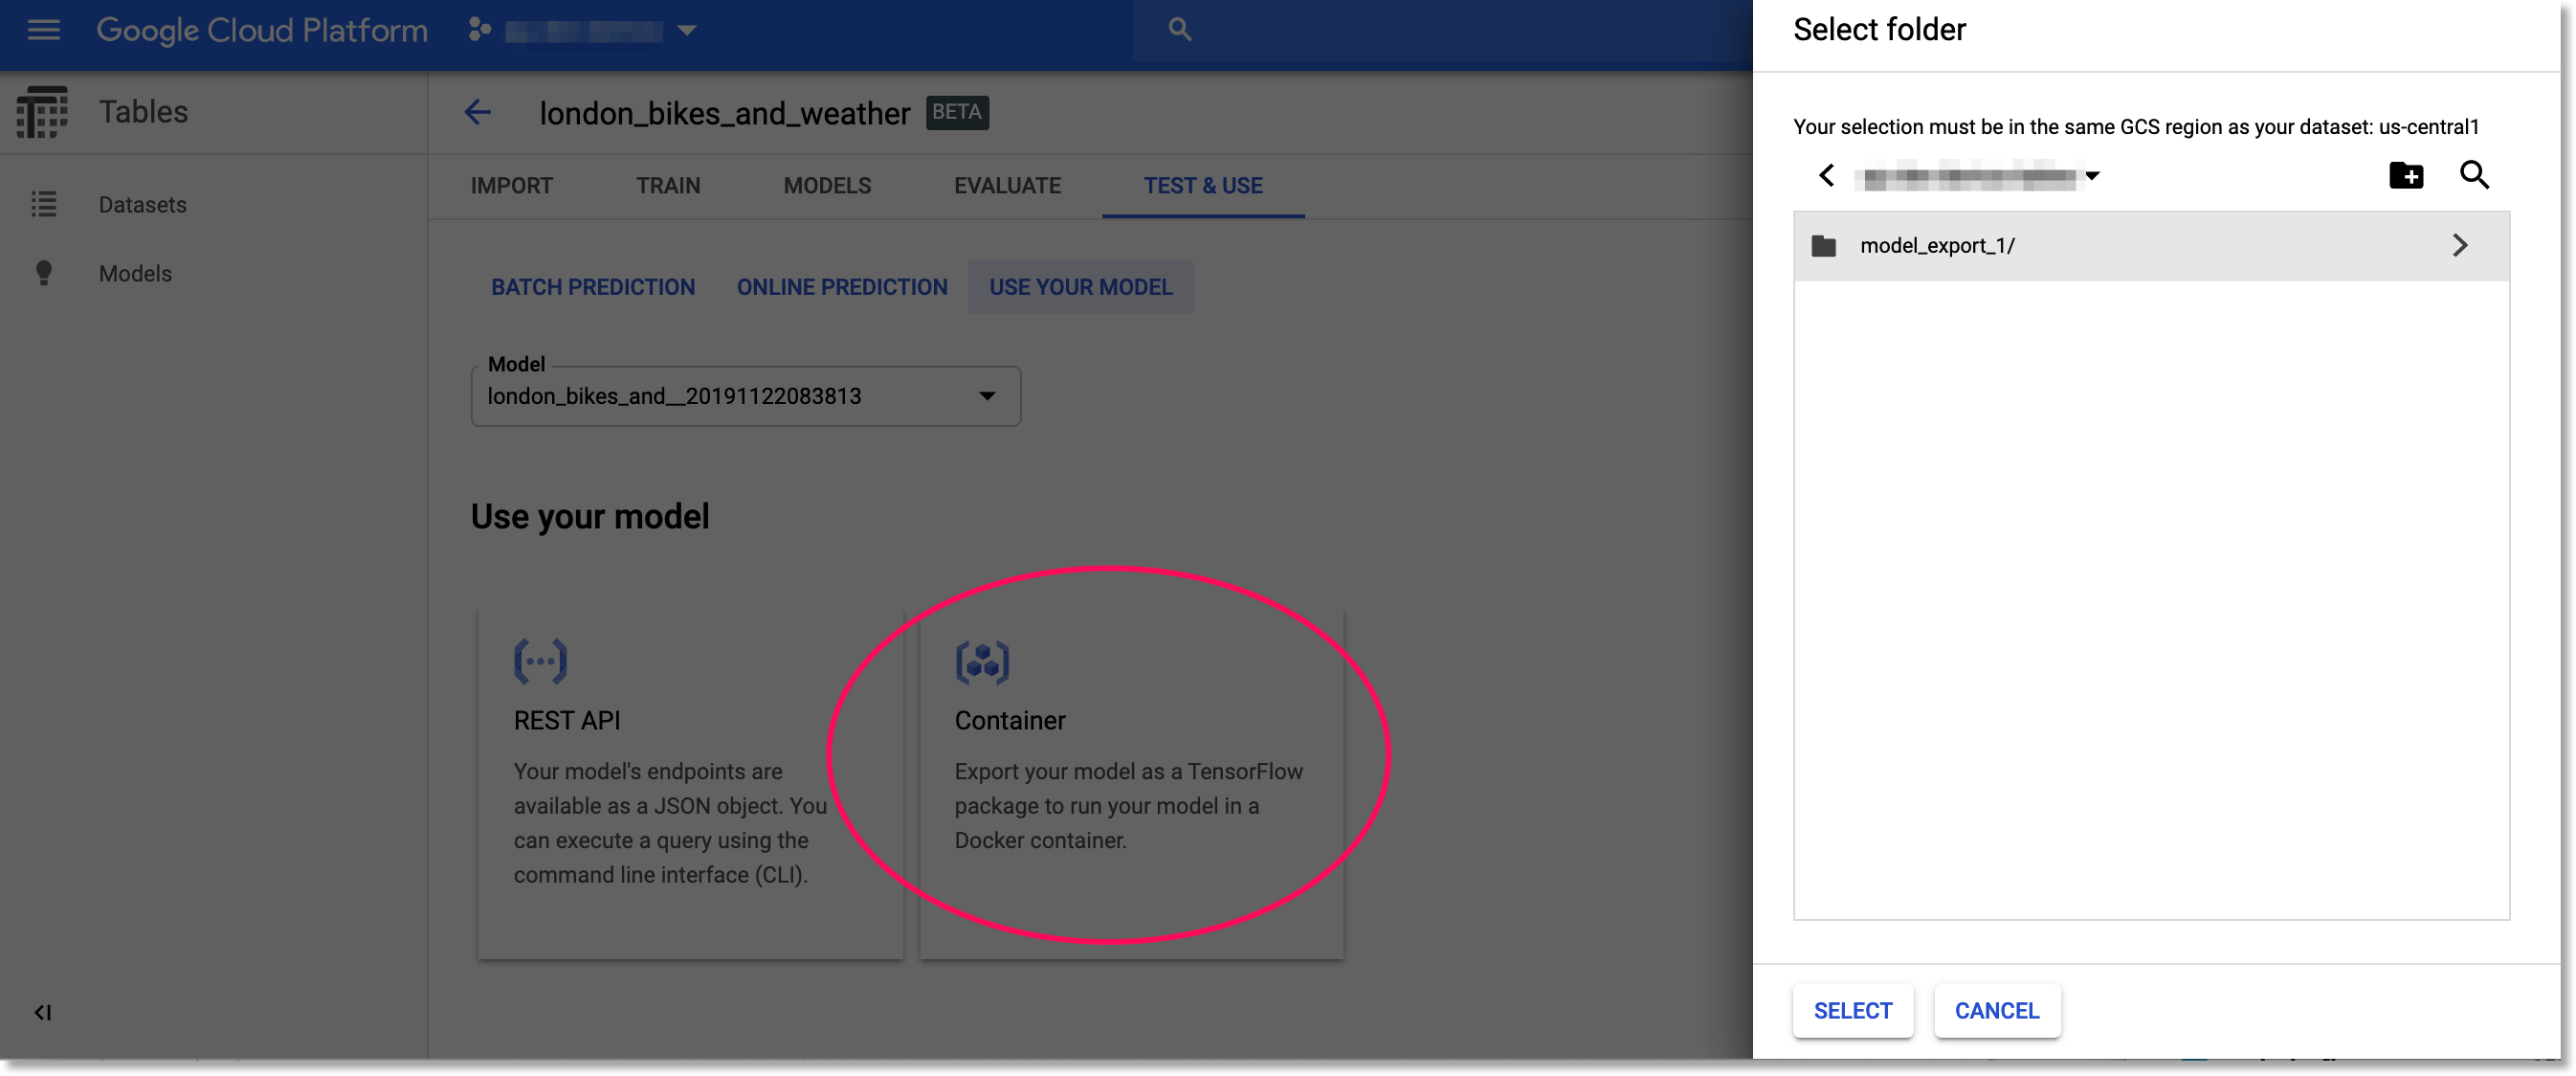
Click the "Container" card to export your trained model to be run from a Docker container.
Browse to select the GCS folder into which you want to export your model, then click the EXPORT button.
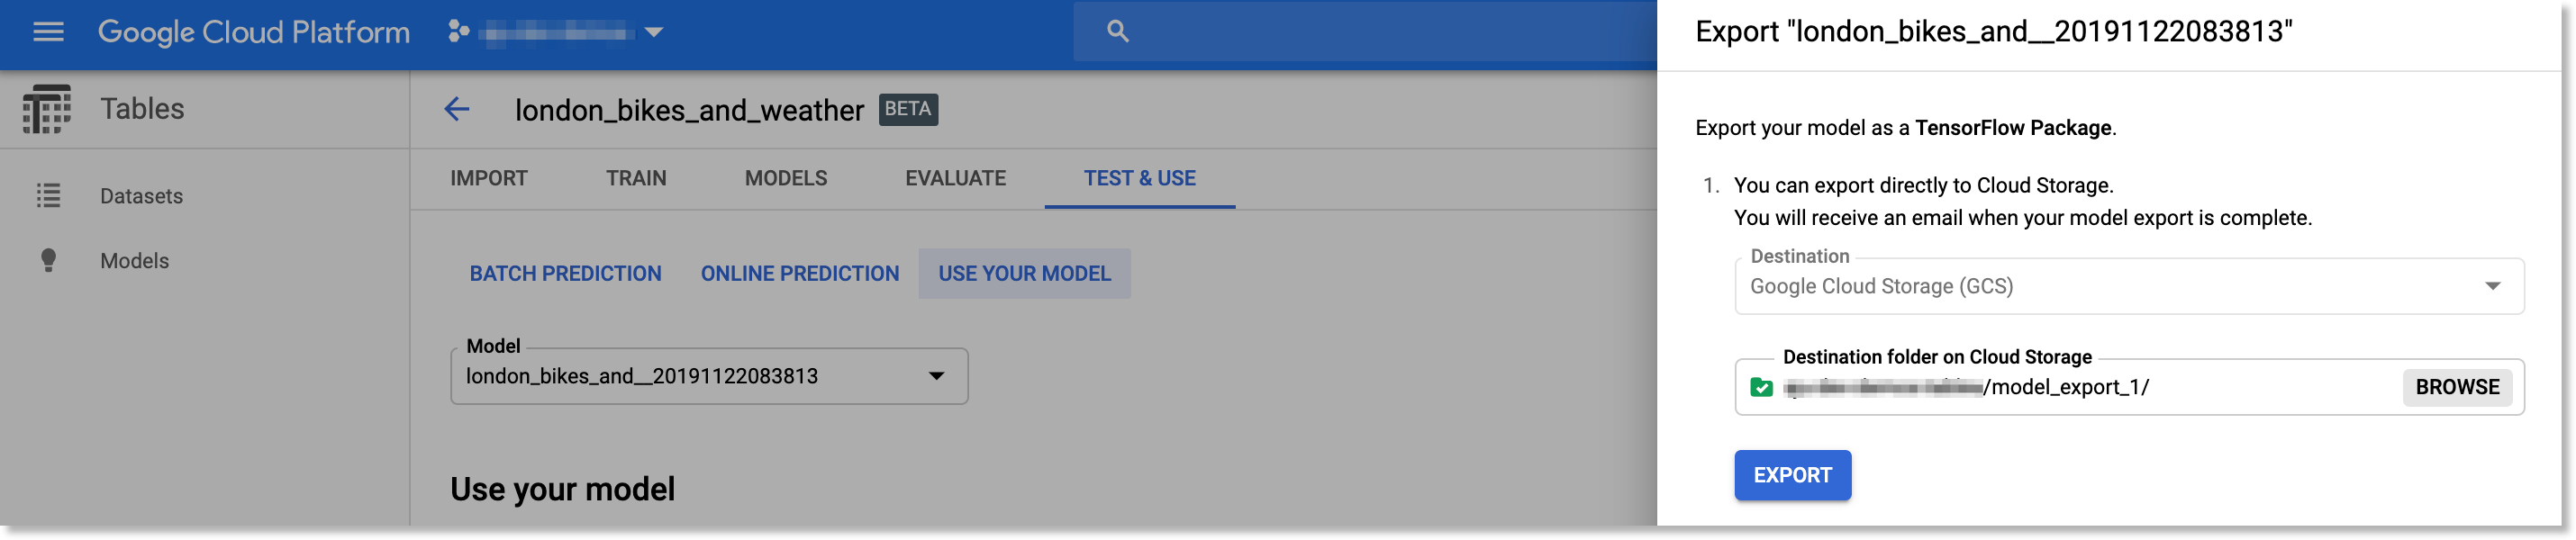
Browse to the GCS folder into which you want to export your model.
When the export is finished, create a local directory to hold your model, e.g. something like bikes_weather.
Copy the download command in the cloud console, which will look something like the following:
gsutil cp -r gs://<your-bucket>/model_export_1//* ./download_dir
Edit this command: add quotes around the gs URI, and remove one of the end slashes. Then edit download_dir to point to the directory you created. The result should look something like the following. Run it from the parent directory of your bikes_weather directory:
gsutil cp -r 'gs://<your-bucket>/model_export_1/*' ./bikes_weather
The exported model will be copied to ./bikes_weather.
Note: to run gsutil, you will need gcloud installed. You can run these commands from the Cloud Shell instead of your local machine if you don’t want to install the SDK locally.
Test your exported model locally
Once you’ve downloaded your model, you can run and test it locally. This provides a good sanity check before deploying to Cloud Run. The process is described in the documentation; we’ll summarize here.
- change to the
bikes_weatherdirectory (or whatever you named it). You should see amodel_exportsubdirectory, the result of your download. - rename the subdirectory as described in the documentation, to remove the timestamp suffix.
Then, create and run a container to serve your new trained model. Edit the following to point to your renamed directory path:
docker run -v `pwd`/model-export/tbl/<your_renamed_directory>:/models/default/0000001 -p 8080:8080 -it gcr.io/cloud-automl-tables-public/model_server
This starts up a model server to which you can send requests. Note that we’re using the gcr.io/cloud-automl-tables-public/model_server container image and mounting our local directory.
Next, download this instances.json file. If you take a look at it, you can see that it holds data for three prediction instances.
From the directory where you placed instances.json, run:
curl -X POST --data @instances.json http://localhost:8080/predict
It may take a second or two for the first request to return, but subsequent requests will be faster. You’ll get back predictions for all of the instances in the json file.
The actual duration for the third instance is 1200.
View information about your exported model in TensorBoard
You can view your exported custom model in TensorBoard. This requires a conversion step. You will need to have TensorFlow 1.14 or 1.15 installed to run the the conversion script.
Then, download this script, e.g. via curl -O https://raw.githubusercontent.com/amygdala/code-snippets/master/ml/automl/tables/model_export/convert_oss.py, to the parent directory of model_export. Create a directory for the output (e.g. converted_export), then run the script as follows:
mkdir converted_export
python ./convert_oss.py --saved_model ./model-export/tbl/<your_renamed_directory>/saved_model.pb --output_dir converted_export
The script requires TensorFlow 1.x. Then, point TensorBoard to the converted model graph:
tensorboard --logdir=converted_export
You will see a rendering of the model graph, and can pan and zoom to view model sub-graphs in more detail.
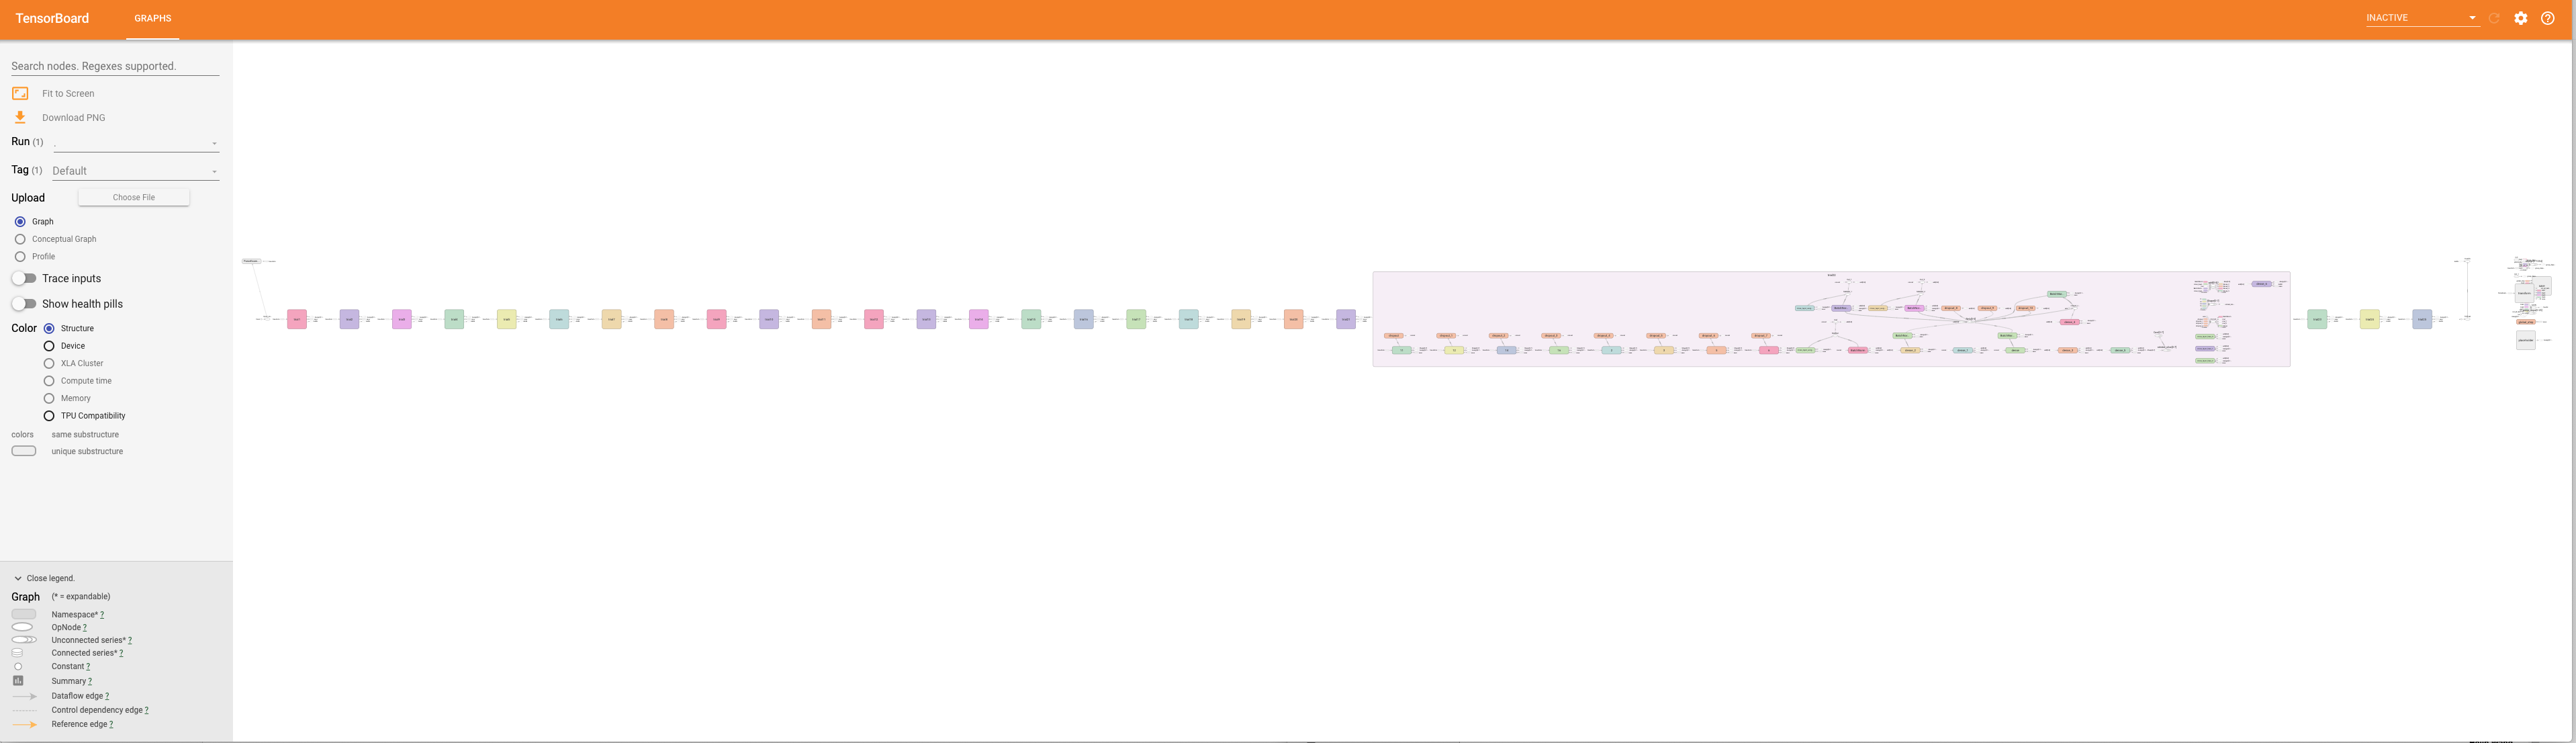
You can view an exported custom Tables model in Tensorboard.

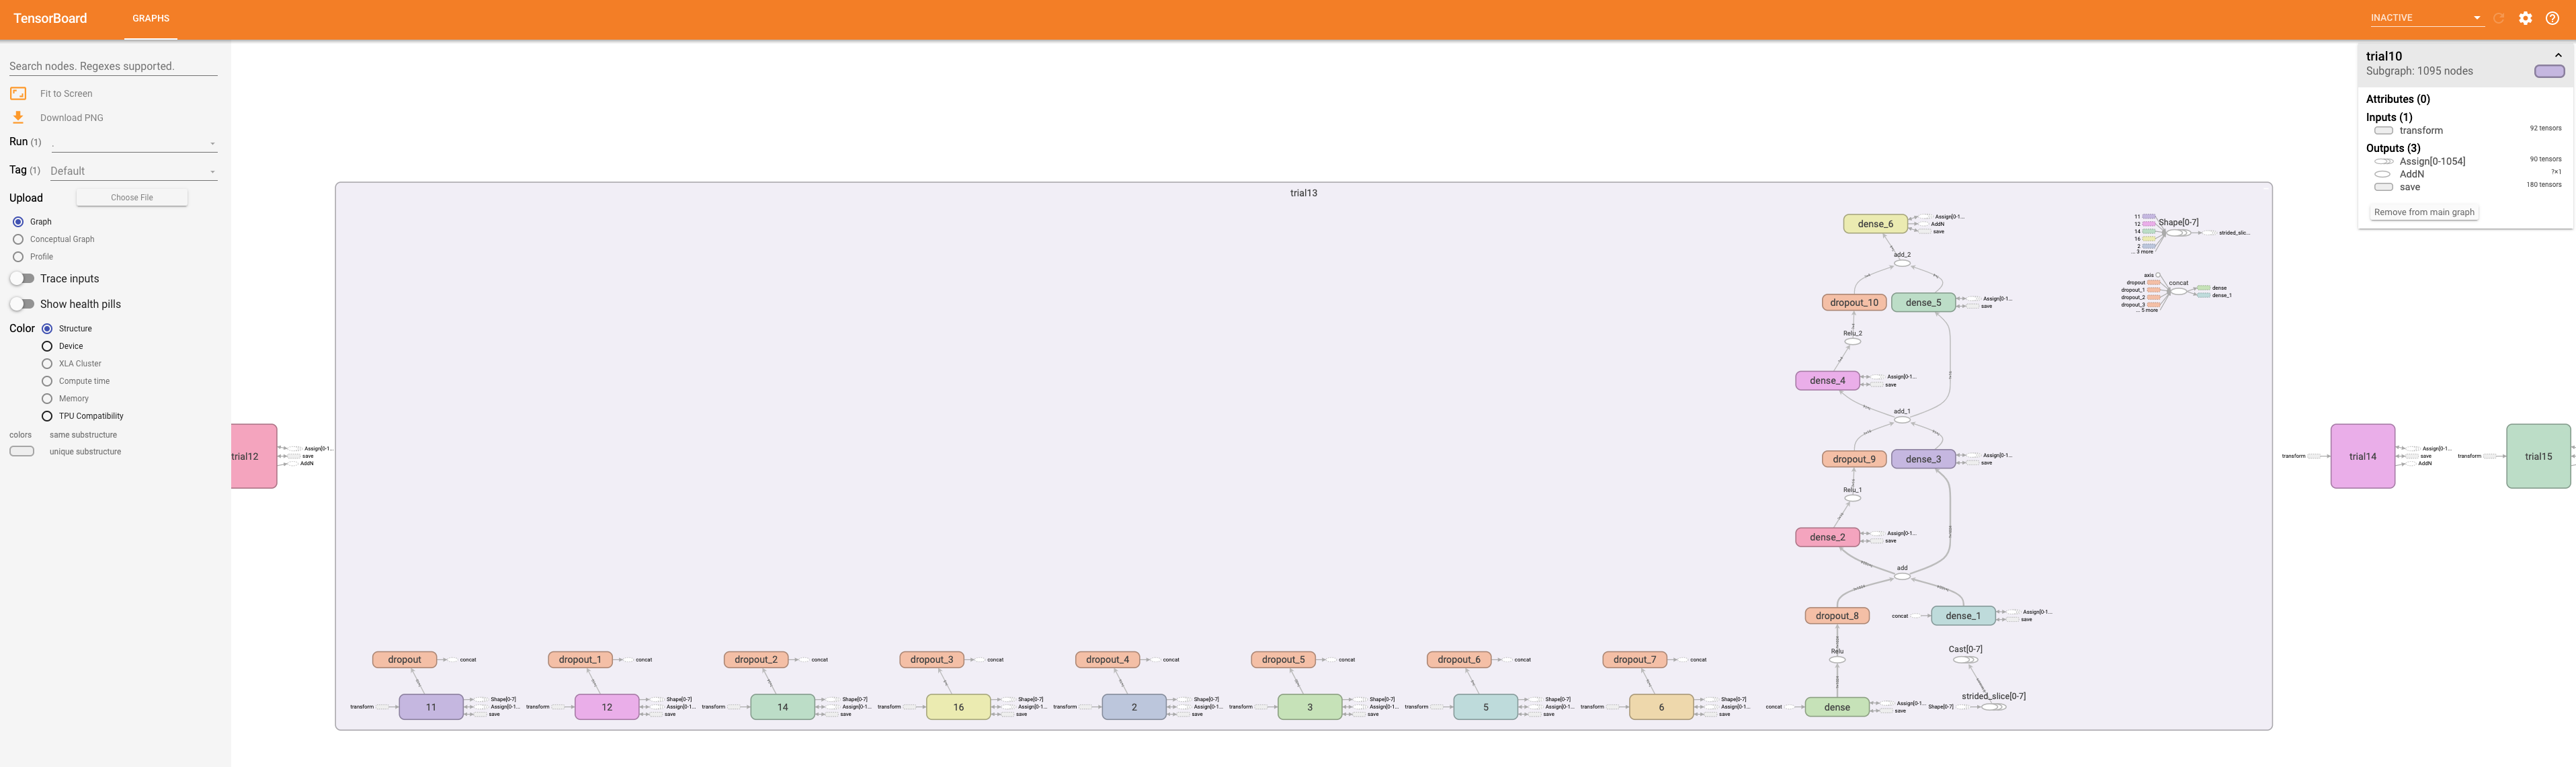
Zooming in to see part of the model graph in more detail.
Create a Google Cloud Run service based on your exported model
At this point, we have a trained model that we’ve exported and tested locally. Now we are almost ready to deploy it to Cloud Run.
As the last step of prep, we’ll create a container image that uses gcr.io/cloud-automl-tables-public/model_server as a base image and ADDs the model directory, and push that image to the Google Container Registry, so that Cloud Run can access it.
Build a container to use for Cloud Run
In the same bikes_weather directory that holds the model_export subdir, create a file called Dockerfile that contains the following two lines. The template is here as well; edit the second line to use your correct path to the exported model, the same path that you used above when running locally.
FROM gcr.io/cloud-automl-tables-public/model_server

ADD model-export/tbl/YOUR_RENAMED_DIRECTORY /models/default/0000001
Then, build a container from the Dockerfile. In this example we’ll call it bw-serve.
You can do this as follows (replace [PROJECT_ID] with the id of your project):
docker build . -t gcr.io/[PROJECT_ID]/bw-serve
Then push it to the Google Container Registry (again replacing [PROJECT_ID] with the id of your project):
docker push gcr.io/[PROJECT_ID]/bw-serve
(If you get an error, you may need to configure Docker to use gcloud to authenticate requests to Container Registry.)
Alternately, you can use Cloud Build to build the container instead, as follows:
gcloud builds submit --tag gcr.io/[PROJECT_ID]/bw-serve .
Create your Cloud Run service
Now we’re ready to deploy the container we built to Cloud Run, where we can scalably serve it for predictions. Visit the Cloud Run page in the console. (Click the “START USING..” button if necessary). Then click the CREATE SERVICE button.

Creating a Cloud Run Service
For the container URL, enter the name of the container that you just built above. Select the “Cloud Run (fully managed)” option. Create a service name (it can be anything you like). Select the Require Authentication option. Then, click on SHOW OPTIONAL REVISION SETTINGS. Change the Memory allocated option to 2GiB. Leave the rest of the defaults as they are, and click CREATE.
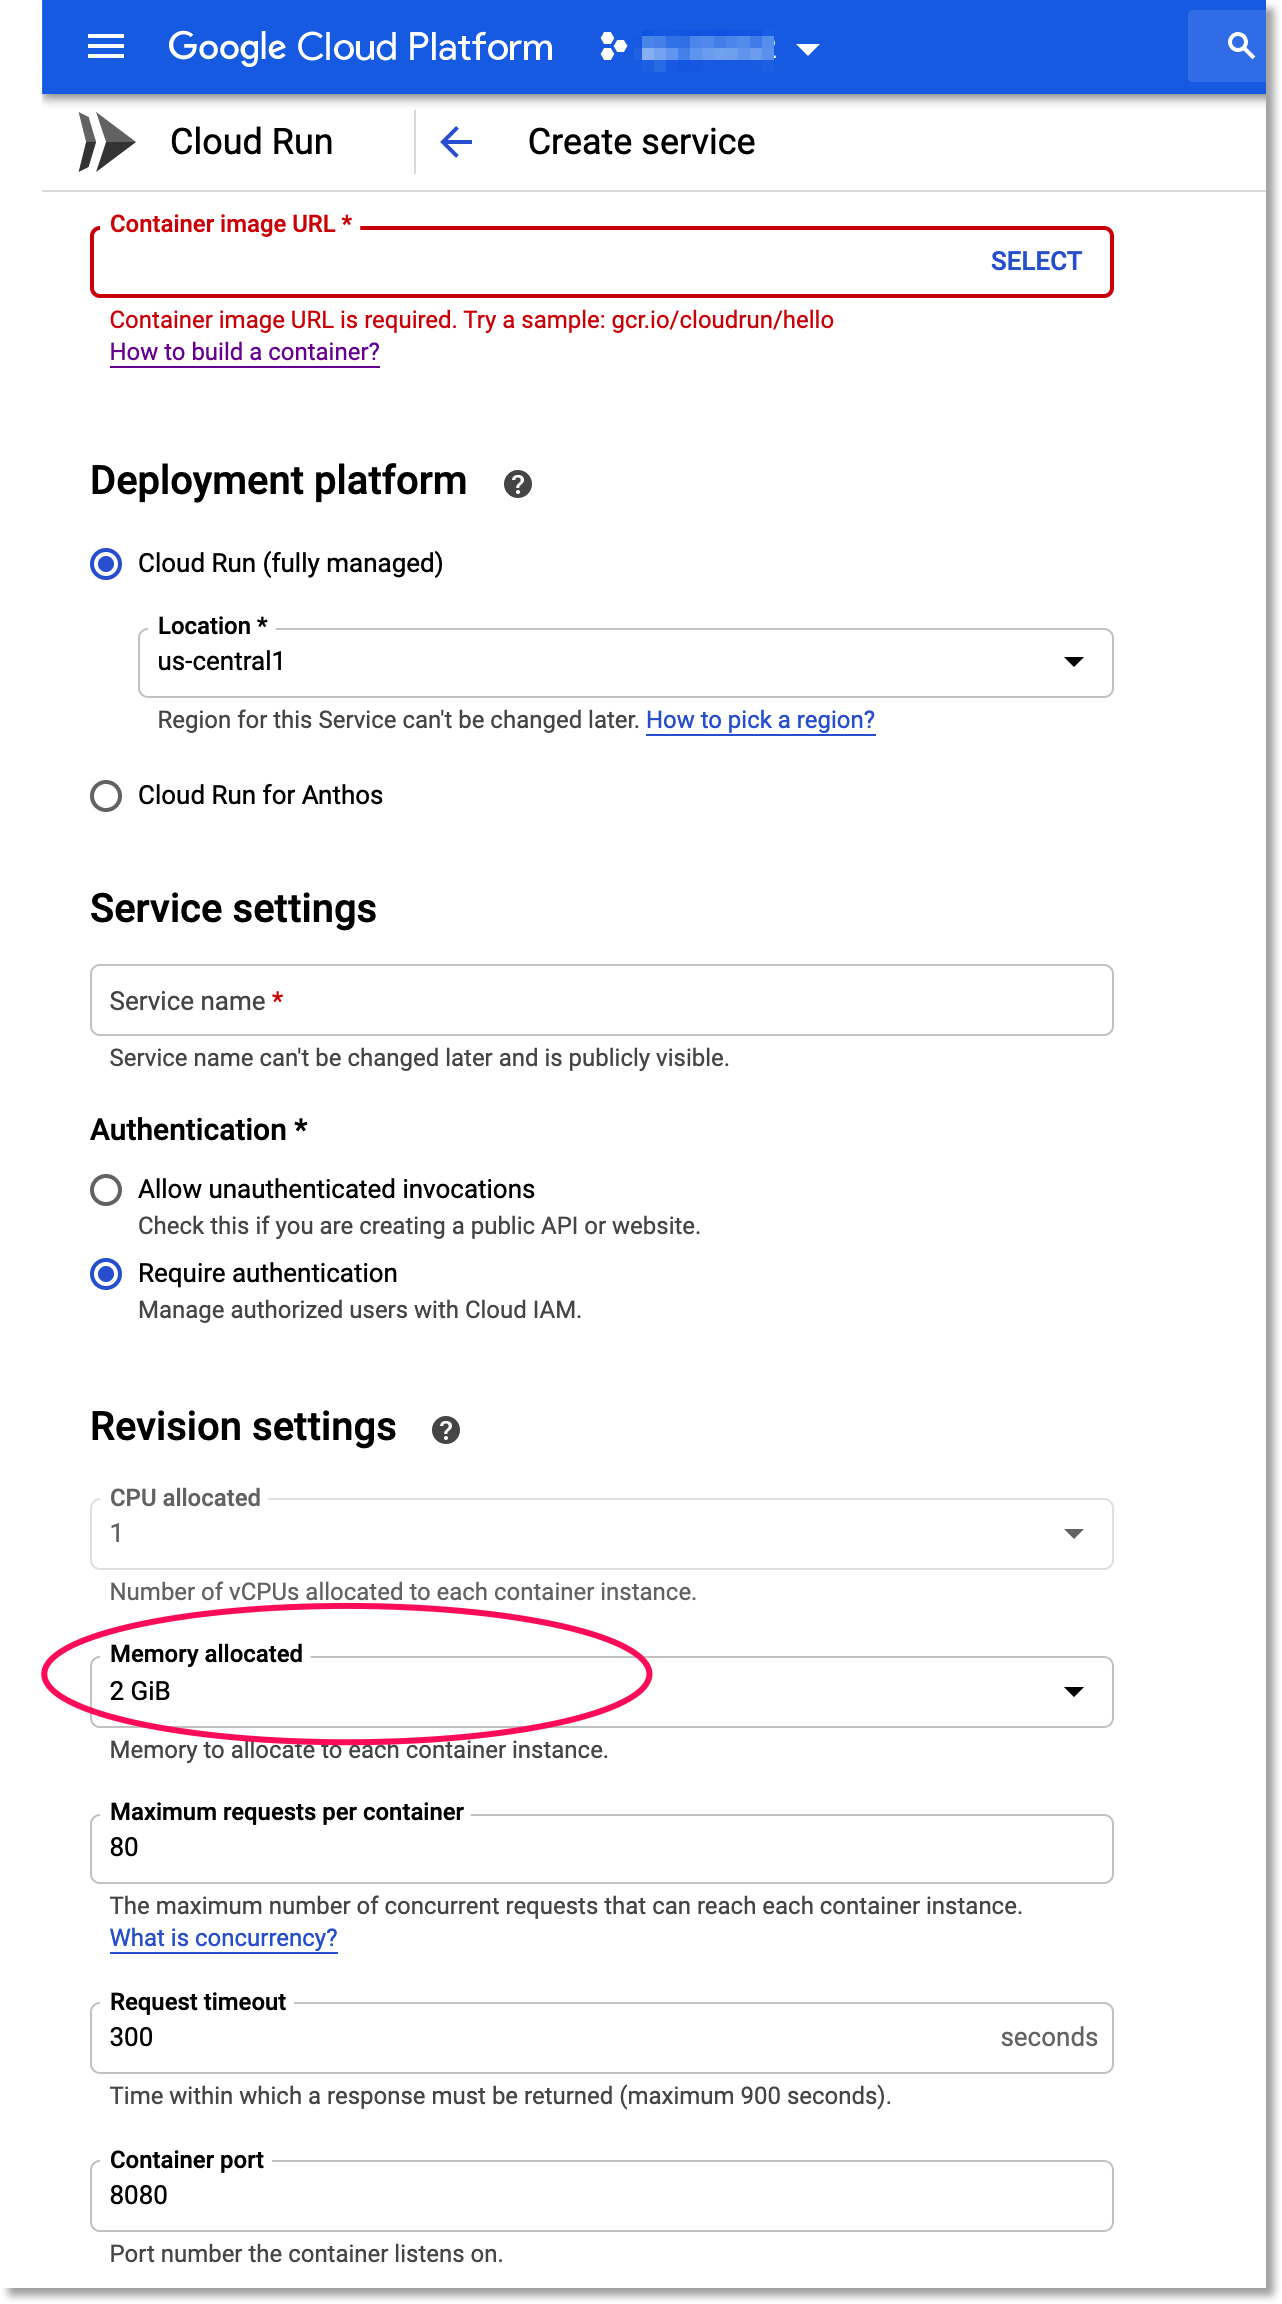
Set your service instances to use 2GiB of memory
Send prediction requests to the Cloud Run service
Once your Cloud Run service is deployed, you can send prediction requests to it. Your new service will have a URL that starts with your service name (and ends with run.app). You can send JSON predictions to the Cloud Run service just as with the local server you tested earlier; but with Cloud Run, the service will scale up and down based on demand.
Assuming you selected the Require Authentication option, you can make prediction requests like this:
curl -X POST -H \
"Authorization: Bearer $(gcloud auth print-identity-token)" --data @./instances.json \
https://<your-service-url>/predict
(If you set up your Cloud Run service endpoint so that it does not require authentication, you don’t need to include the authorization header in your curl request).
What’s next?
In this post, we walked through how to export a custom AutoML Tables trained model, view model information in TensorBoard, and build a container image that lets you serve the model from any environment. Then we showed how you can deploy that image to Cloud Run for scalable serving.
Once you’ve built a model-serving container image, it’s easy to deploy it to other environments as well. For example, if you have installed Knative serving on a Kubernetes cluster, you can create a Knative service like this, using the same container image (again replacing [PROJECT_ID] with your project):
apiVersion: serving.knative.dev/v1
kind: Service
metadata:
  name: bikes-weather
spec:
  template:
    spec:
      containers:
        - image: gcr.io/[PROJECT_ID]/bw-serve
(While our example model fits on a 2GiB Cloud Run instance, it’s possible that other of your models may be too large for the managed Cloud Run service, and serving it via Kubernetes/GKE is a good alternative).
If you’re curious about the details of your custom model, you can use Stackdriver Logging to view information about your AutoML Tables model. Using Logging, you can see the final model hyperparameters as well as the hyperparameters and object values used during model training and tuning.
You may also be interested in exploring the updated AutoML Tables client libraries, which make it easy for you to train and use Tables programmatically, or reading about how to create a contextual bandit model pipeline using AutoML Tables, without needing a specialist for tuning or feature engineering.