Learning and using your own image classifications
- Introduction
- Transfer learning: building your own image classifier
- An easy way to use your trained image classifier
- An example app: “would you hug that?”
- Exporting your trained model to Cloud ML
- Using the “hugs classifier” for prediction with the Cloud ML API
- Bonus: Hedgehogs vs Dandelions
- What Next?
Introduction
The Google Vision API is great for identifying labels, or categories, for a given image. However, sometimes you want to further classify your own images, for more specialized categories that the Google Vision API hasn’t been trained on. E.g., maybe you’re a birdwatcher and want to recognize rare species of birds that the Vision API doesn’t do well at discriminating. Maybe you’re a cell biologist, and want to try to automatically classify your slides.
It turns out that it can be pretty straightforward to build your own neural net model to do this, via transfer learning – bootstrapping an existing image classification model to reduce the effort needed to learn something new.
In this post, we’ll take a look at an example that does that.
Transfer learning: building your own image classifier
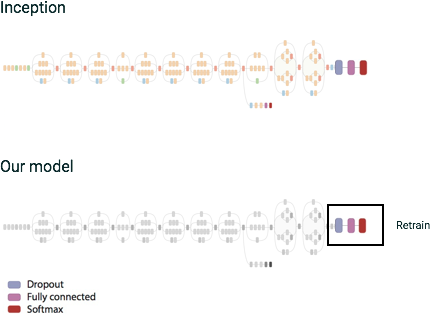
One such deep neural net model is the Inception architecture, built using TensorFlow, a machine learning framework open-sourced by Google. Google has also open-sourced the Inception v3 model, trained to classify images against 1000 different ImageNet categories. We can use its penultimate “bottleneck” layer to train a new top layer that can recognize other classes of images: your own classes. We’ll see that our new top layer does not need to be very complex, and that we typically don’t need much data or much training of this new model, to get good results for our new image classifications.
There have been some great posts showing how you can train this new ‘top layer’ model with TensorFlow, and how to do this training on Google Cloud Machine Learning.
An easy way to use your trained image classifier
In this post, we’ll focus more on the next step: After you’ve trained your model, and can classify your own images, you’ll want to be able to use the model for inference (prediction). That is, given a new image, you’d like to ask: which of your categories does it fall into?
You’ll often need to have these prediction capabilities scale up. Perhaps you’ve built a mobile app to (say) recognize bird species, by using your trained ML model for online species prediction. If the app becomes wildly popular, you don’t want it to stop working because it’s getting too much traffic.
Google Cloud Machine Learning (Cloud ML) is an easy way to do this: in addition to supporting distributed model training, Cloud ML lets you scalably serve your online predictions after the model is trained.
One way to access the Cloud ML online prediction service is to use the Google API Client Libraries to access the Cloud ML API. That means that it is quite straightforward to build an app that classifies images according to your categories, and scales up without your needing to do anything.
An example app: “would you hug that?”
Let’s look at an example with a … kind of goofy data set. The code used to train this model and make this app is here.
(Note: This post is not really a tutorial – the README in the repo walks you through the process of building the example in more detail. If you want to give it a try, make sure you’ve done all the necessary setup first).
Suppose we have a set of training images that have been labeled according to two categories: “things you might want to hug”, and “things you would not want to hug”. The ‘huggable’ dataset includes images of things like puppies and kittens. The non-huggable dataset includes images of things with sharp edges, etc. Now, we want to build a web app that we can upload images to, and have the app tell us whether or not the object is something “huggable”.
We want our web app to work like this: If you upload an image to the app:
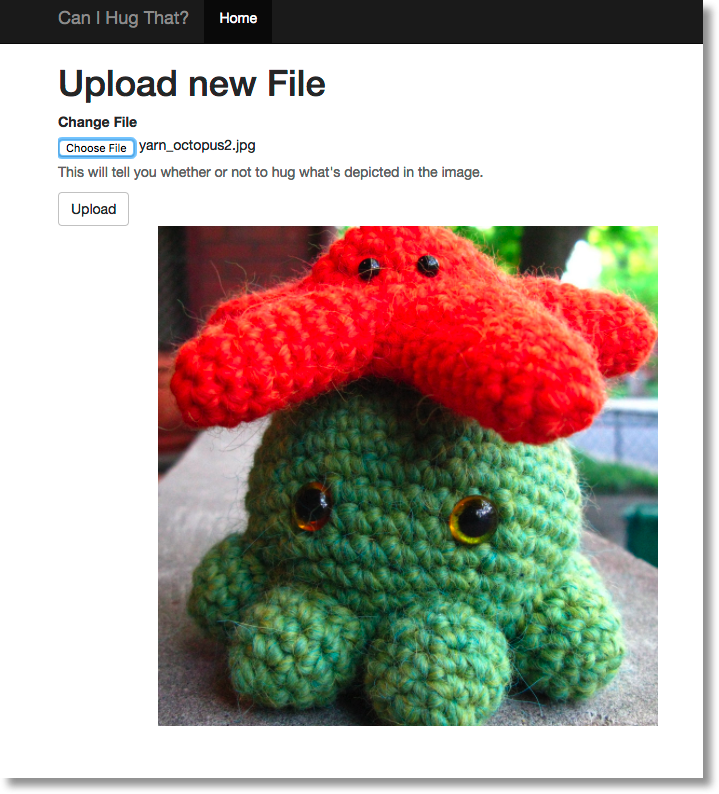
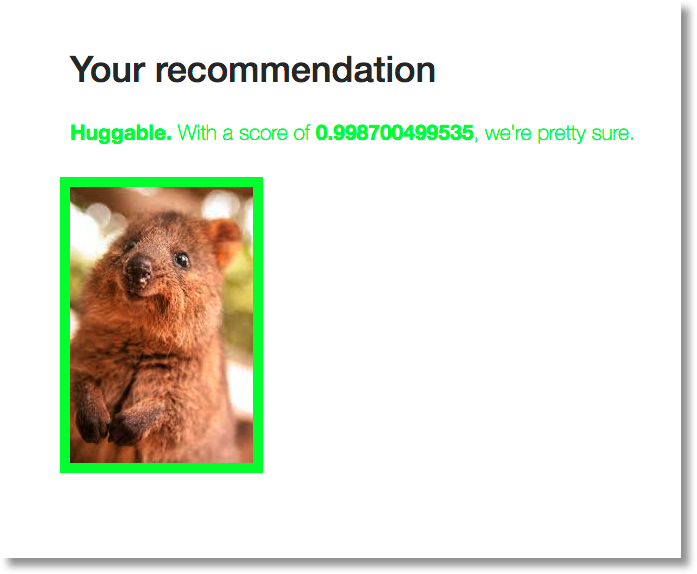
…the app uses the trained model to get the predicted category of the image (“hugs”? “no hugs”?). Then the app will use the response to display the results:

Thanks to Julia Ferraioli for the idea, the “hugs/no-hugs” dataset and an earlier version of the prediction web app.
We’ll train our “hugs/no-hugs” model on Cloud ML, and use the Cloud ML API to make it easy to build the prediction web app.
To do this, we first need to do some image preprocessing, to extract the ‘bottleneck layer’ information (the embeds) from the Inception v3 model, for each image in our dataset. These embeds will form the input data for the new ‘top layer’ model that we will train. We will use Cloud Dataflow (Apache Beam) to do this preprocessing – that is, the Beam pipeline uses the Inception v3 model to generate the inputs. We’ll save those preprocessing results in the cloud, in Google Cloud Storage (GCS), as TFRecords, for easy consumption by the training process.
Then, we’re ready to train the model. Follow the code link to see the specifics. (If you follow the blog post links above, you’ll also find other examples that train using a different “flowers” dataset.)
Once the model is trained, we can use it to classify new images. If we deploy the trained model to Cloud ML, we can make prediction requests using the Cloud ML API scalably, without any other setup. This is great, since it makes our web app very easy to write.
Exporting your trained model to Cloud ML
To be able to use a trained model for prediction, you will need to add input and output collections to your model graph. This gives Cloud ML the necessary ‘hooks’ into your deployed model graph for running predictions and returning the results. See this model prediction graph definition for an example. You’ll also need to make sure you export (save) your model as described here, including exporting the MetaGraph. See this method for example export code.
Once you’ve done that, you can deploy a trained model to Cloud ML like this. First, “create the model” in Cloud ML – this does not define the actual model, but creates a name to associate with the model once you upload it. For example:
gcloud beta ml models create hugs
Then, deploy a version of that model by pointing Cloud ML to the checkpointed model info that was saved as the final result of your training session. The command to do that will look something like this:
gcloud beta ml versions create v1 \
  --model hugs \
  --origin gs://your-gcs-bucket/path/to/model
It will take a few minutes to create the model version. Once that’s done, you can start to access it for prediction in your apps. Each time you deploy a new version of your model, you will use a new version name. If you have more than one version of a model, you can set one as the default.
Using the “hugs classifier” for prediction with the Cloud ML API
Once your model is deployed, there are various ways to access it. One easy way for initial testing is just to use the gcloud sdk from the command line.
But, for the web app, we’ll use the Google API client libs instead, to call the Cloud ML API web service. So we just need to upload an image to the app; format the image data for input to our model; then just make the API call1 and display the response.
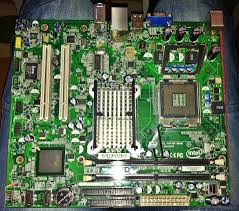
For example, if we upload this photo of a motherboard…
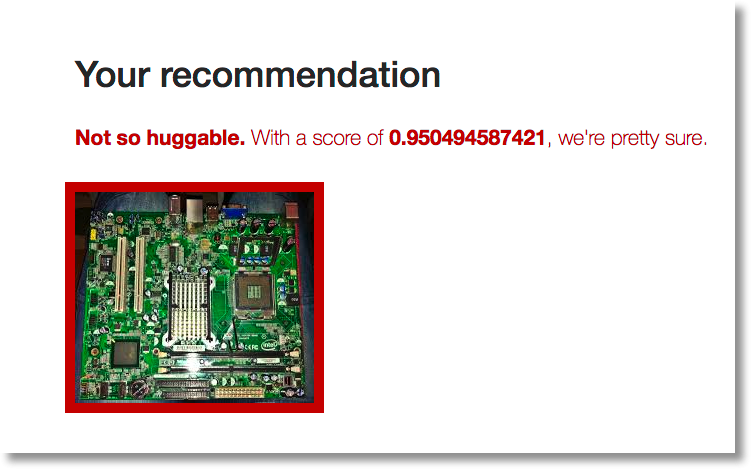
… it’s judged as “not huggable”.
Here is a Python code snippet showing a prediction API call:
from googleapiclient import discovery
from oauth2client.client import GoogleCredentials

def create_client():

  credentials = GoogleCredentials.get_application_default()
  ml_service = discovery.build(
      'ml', 'v1beta1', credentials=credentials)
  return ml_service


def get_prediction(ml_service, project, model_name, input_image):
  request_dict = make_request_json(input_image)
  body = {'instances': [request_dict]}

  # This request will use the default model version.
  parent = 'projects/{}/models/{}'.format(project, model_name)
  request = ml_service.projects().predict(name=parent, body=body)
  result = request.execute()
  return result
You can see more detail on how the uploaded image was formatted for the API request, and how the response was parsed, here.
A quokka, in contrast, is (very rightly) judged as “huggable”.
Bonus: Hedgehogs vs Dandelions
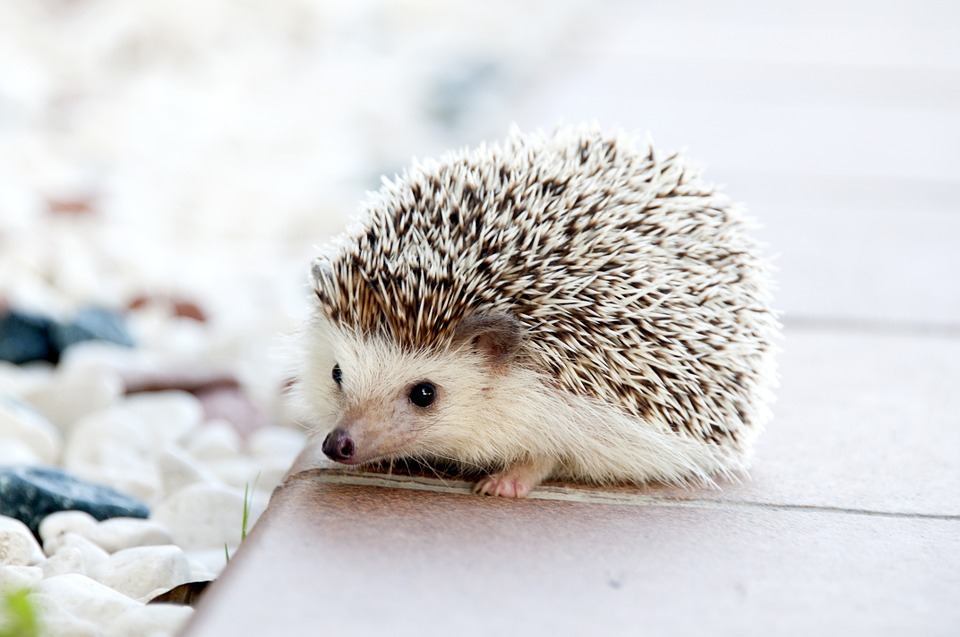
When I was experimenting with learning both the “hugs/no-hugs” and “flowers” classification models, I learned something funny2. I accidentally fed the “flowers” model an image of a hedgehog. The hedgehog was meant for the “hugs/no-hugs” model, which will reasonably classify it as “don’t hug”.
It turns out that if you ask the “flowers” model what kind of flower a hedgehog is, it will classify it pretty confidently as looking most like a dandelion. This seems pretty astute of the flowers model!
$ python images_to_json.py hedgehog.jpg
$ gcloud beta ml predict --model flowers --json-instances request.json
KEY                             PREDICTION  SCORES
prediction_images/hedgehog.jpg  1           [0.006916556041687727, 0.9633635878562927, 0.0015918412245810032, 0.005548111163079739, 0.022190041840076447, 0.0003897929273080081]
$ gsutil cat gs://cloud-ml-data/img/flower_photos/dict.txt
daisy
dandelion
roses
sunflowers
tulips
(We can see this is so because dandelion is in the ‘1’ index position in the
flower dataset’s dict.txt, corresponding to the prediction of ‘1’.)
What Next?
If you’re interested to learn more about TensorFlow and CloudML, there are many examples and tutorials on the TensorFlow site. The Cloud ML docs go into much more detail on how to train and serve a model, including Cloud ML’s support for distributed training and hyperparamter tuning.
(You might also be interested in the upcoming Google Cloud Next event, where you can hear much more about what Google is doing in the Big Data & Machine Learning area.)
1: While the prediction service is in alpha, you may sometimes see a 502 error response if you make a request after not having used the service for a while. If you see this, just resubmit. This will not be an issue once the service moves out of alpha.
2: It’s possible that this amuses only me.
Image credits:
- https://goo.gl/images/zdGnN9 - yarn octopus
- https://goo.gl/images/LmaVMu - motherboard
- https://goo.gl/images/XTF5h0 - quokka
- https://goo.gl/images/yuFM1C - hedgehog